Loading timer

LTSV > RRV Index > User Guide
This page gives some guidance on how to use the LTSV-RRV website, and is also available as a PDF document. Left-click the link below to view the PDF in your browser, or right-click to download it.
PDF icon RRV User Guide (Version 1, correct to 23/01/2022. 32 pages, 3.5MB)
Contents:
Navigating around the site
Registering for an account
Contributing information
    Sightings
    Notes
    Photolinks
    New Vehicle Reports
Getting more help

Navigating around the site

The main sections of the website are indicated by the buttons across the top menu. Other areas can be accessed using the links at the bottom of each page.

Much of the website is formed of paired 'list' and 'detail' pages. The list pages show multiple items (for example vehicles, photos or sightings). Each page shows up to 100 items, with links to move to other pages. List pages can normally be searched, sorted and/or filtered as required. Note that any searches, sorting or filtering applied by a user are 'persistent', meaning that it remains in place until you reset or change the selections, or you close your browser window. For example, if you use the photos page to view only Ford vehicles, the next time you go to the photos page, it will still show only Fords.

The detail pages can be accessed by clicking on any individual item on a list page. The detail pages show all the information about the item selected. This can include other lists. For example, if you look at a particular vehicle, the page will show all sightings of the vehicle that have been reported.

To assist users, numerous 'tool-tips' have been added to controls and headings. Hovering your mouse over any item should bring up a text box giving more information. Tool-tips are also indicated by question marks and/or text with dashed blue underlines.

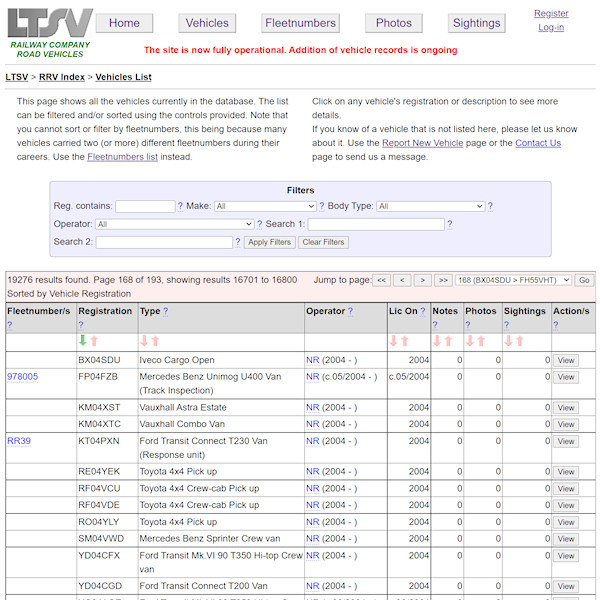
screenshot
A typical list page, in this case the main vehicles list.

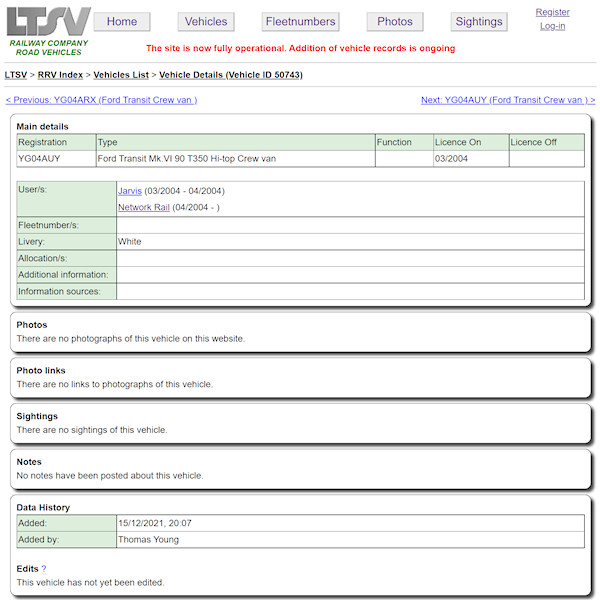
screenshot
A typical detail page, in this case showing an individual vehicle.

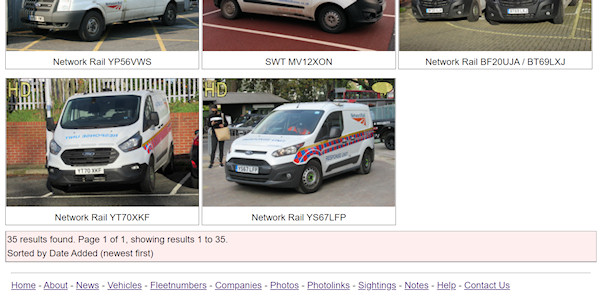
screenshot
As well as the main menu buttons across the top of each page, further navigation options are available across the bottom of each page.

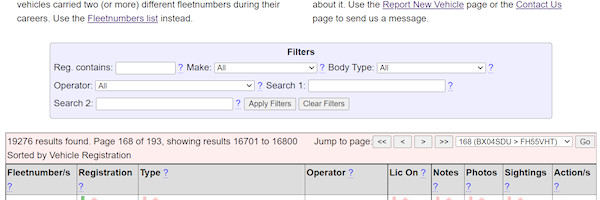
screenshot
Most list pages have a range of filtering options in a mauve-coloured box.

screenshot
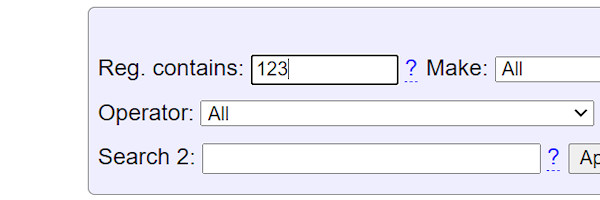
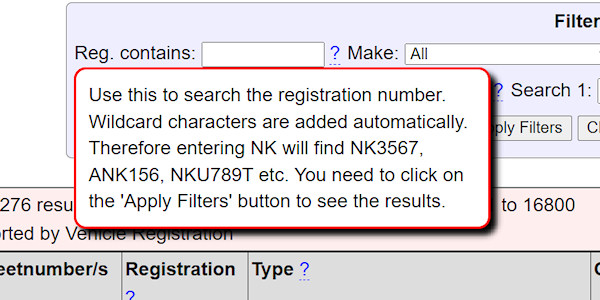
Some of the controls in the filters section are text-entry boxes, where you can type in values (for example, to search for vehicles containing '123' in their registrations).

screenshot
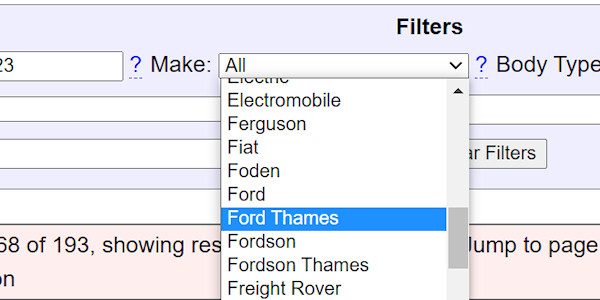
Other filter controls are drop-down boxes, where you can select a value from a list.

screenshot
Any filtering options you select are not applied until you click on the 'Apply Filters' button. Clicking the 'Clear Filters' button will remove all filters.

screenshot
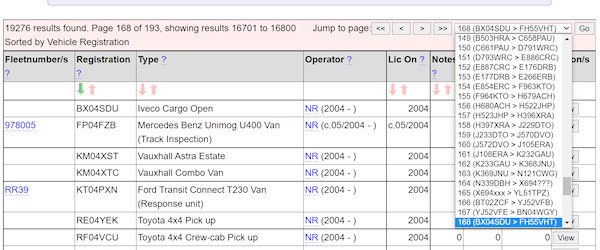
List pages only show up to 100 records at a time. The range of records being displayed is shown in the navigation bar (which is sort of salmon pink). To the right of this bar are controls to jump to other pages. The drop-down box allows you to see what records will appear on each page.

screenshot
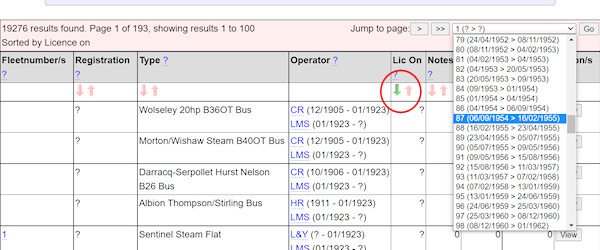
Below the navigation bar are the columns headings, often with tool-tips to give more information, then the sorting bar. Click on any arrow to sort by that column. The sort order applied is shown by the respective arrow being green. This image also shows how the information in the navigation drop-down changes depending on what sort order is applied.

screenshot
Tool-tips, normally indicated by a blue question mark, will give more information or guidance when you hover your mouse over them.

screenshot
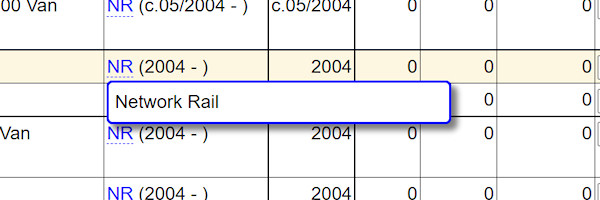
Tool-tips are also used to explain things like acronyms, these being shown by blue dashed underlines. In the example shown, hovering over NR shows that this stands for Network Rail.

screenshot
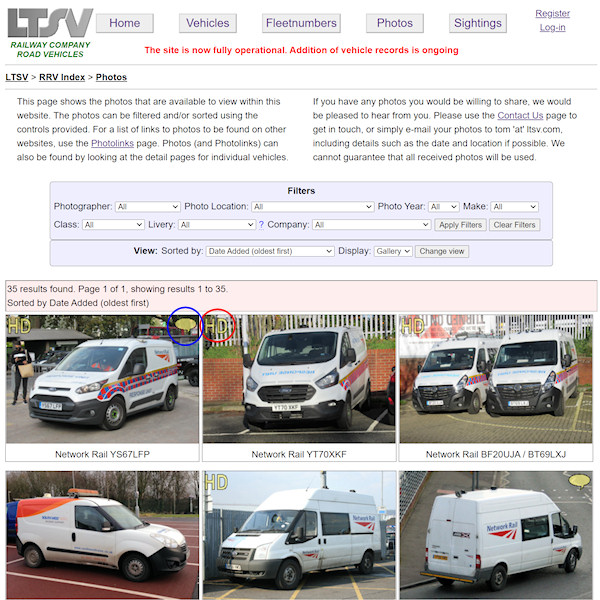
Photos are displayed slightly differently to data, but with the same filtering and navigation tools. The sort order is set using a control below the filters. Icons superimposed on photos show the availability of a high-resolution copy of the photo (marked HD as shown in the red circle) or that notes about the photo have been posted (a speech bubble, as shown in the blue circle).

screenshot
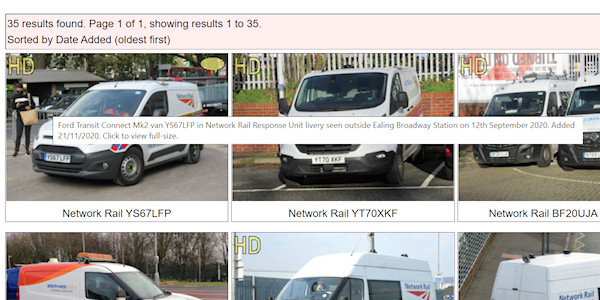
When you hover over one of the small photos on the gallery page, a pop-up will show further details about the photo.

screenshot
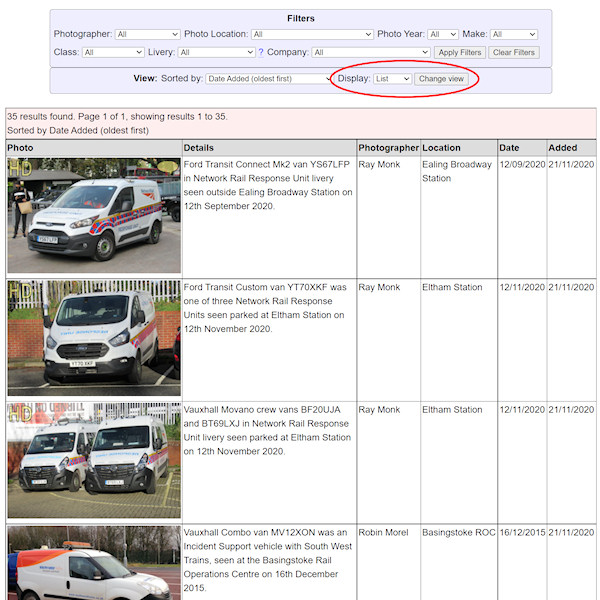
Photos can also be displayed in list view (where the text details are also visible). This is accessed using the drop-down in the view options (red circle).

screenshot
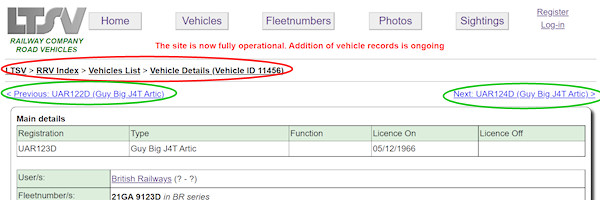
A couple of other navigation tools should be mentioned. Firstly, on most pages there are links below the top menu, showing the current page and the pages higher in the hierarchy. This is known as a breadcrumb trail (highlighted in red here) and items in it can be clicked on to move back to higher pages. Secondly, when looking at a particular vehicle's detail page, there will be links to the previous and next vehicle (highlighted in green). Note that these do not take into account any filtering or sorting that has been applied.

screenshot
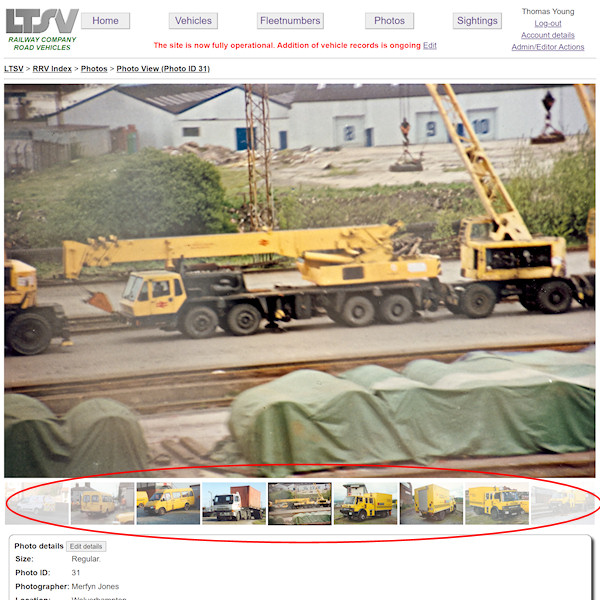
When looking at any given photo, thumbnail images appear below showing (up to) four previous and four next photos (highlighted in red here). Hovering over one of these will show the details, while clicking one will take you to that photo. This facility DOES take into account any filtering and sorting of photos that has been applied.

Registering for an account

This website is intended to be collaborative, in that I would like users to contribute their own observations and information. To do this, users must create an access account. A link to register appears in the top-right corner of the page (unless you are already logged-in).

When you register, you need to supply an e-mail address, a username and a password. You can also supply some biographical info.

O E-mail address
Each account must be related to an active e-mail address, and only one account can be created for any given address. You will use your e-mail address to log-in to the site, but the address will not be visible to other users.

O Username
Each account has a username attached to it. This can be anything you like, though it must not duplicate any already-existing accounts. You can use your name, or a made-up name. This is the name that will appear against any information you post to the site.

O Password
The password can be anything you like, so long as it contains at least one character. For security reasons, it is recommended that you create a password with slightly more characters! 5-10 would be fine, up to 20 is allowed. Passwords can contain letters, numbers or spaces but certain special characters are disallowed. You can check this when registering. You can also change your password at any time.

O Biographical info
This section is optional, but you can use it to tell everyone a little about yourself and what you are interested in.

Admin reserves the right to suspend or delete the access account of any user who mis-uses the facilities or who posts offensive or inappropriate content.
screenshot
Links for registering an account or logging-in appear in the top right corner of the screen.

screenshot
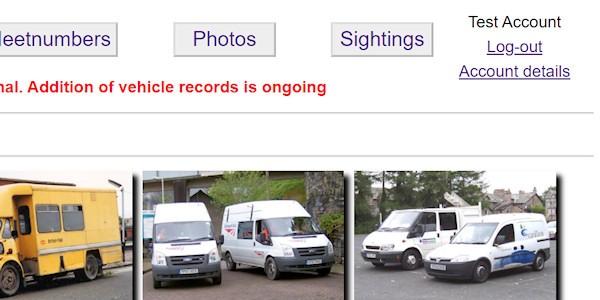
When you are logged-in, the top right corner of the screen shows your username, plus links to log-out or view your account details.

screenshot
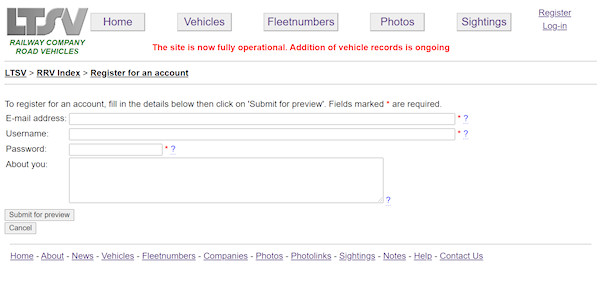
The registration page requires a unique e-mail address, username and password. There is also an optional field for adding some information about yourself.

screenshot
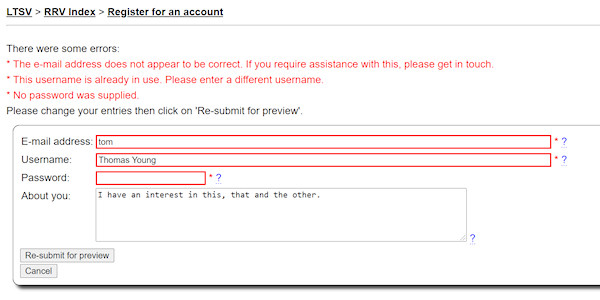
The registration page may show an error in certain cases. This would include missing out any required field, entering a non-valid e-mail address, or one which is already in use, or entering a username that is already in use. You will be prompted to change your entries.

screenshot
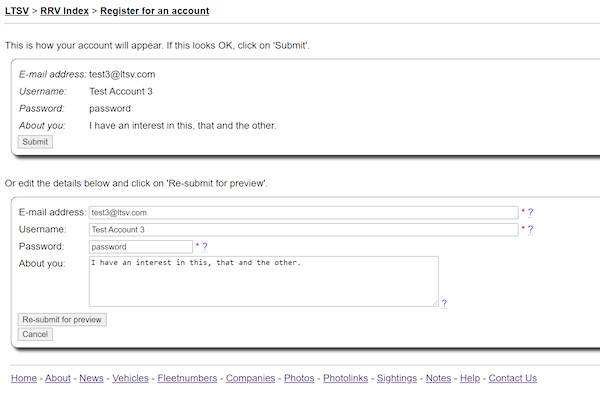
If your entries are OK, a preview will be shown. You can click on 'Submit' to use these entries, or make further changes using the form underneath.

screenshot
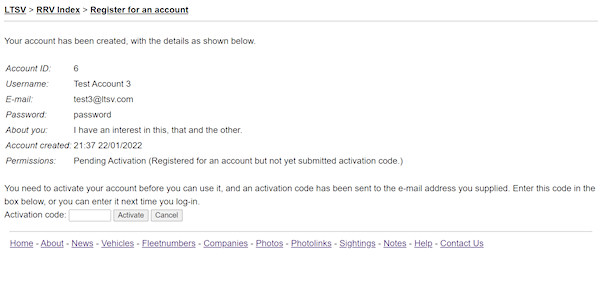
When you submit the registration form, the account is created, and an activation code is e-mailed to the address you supplied. This page shows the account details and asks you to enter the activation code.

screenshot
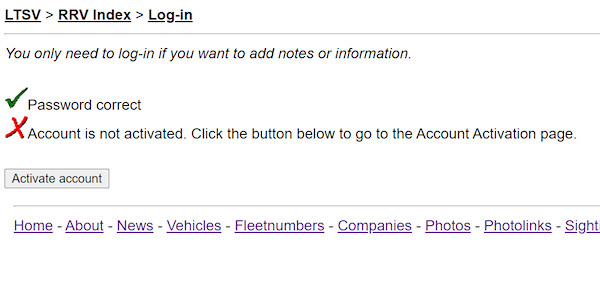
You can enter the activation code later. If you try to log-in to an account that has not been activated, you will see this screen, with a button marked 'Activate account'.

screenshot
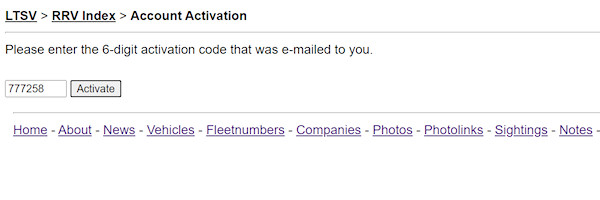
The account activation page has just one field and one button. Activation codes are random 6-digit numbers.

screenshot
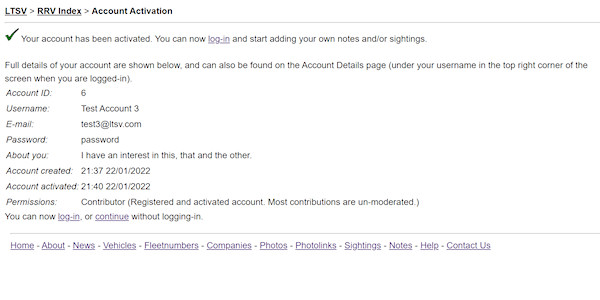
When your account is activated, the screen will show all the relevant details. You will still need to log-in though.

screenshot
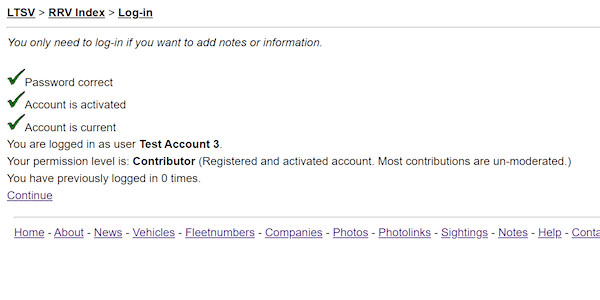
When you log-in to your account you will see this screen. Apart from the first time, this screen will also show the date and time of your previous log-in.

screenshot
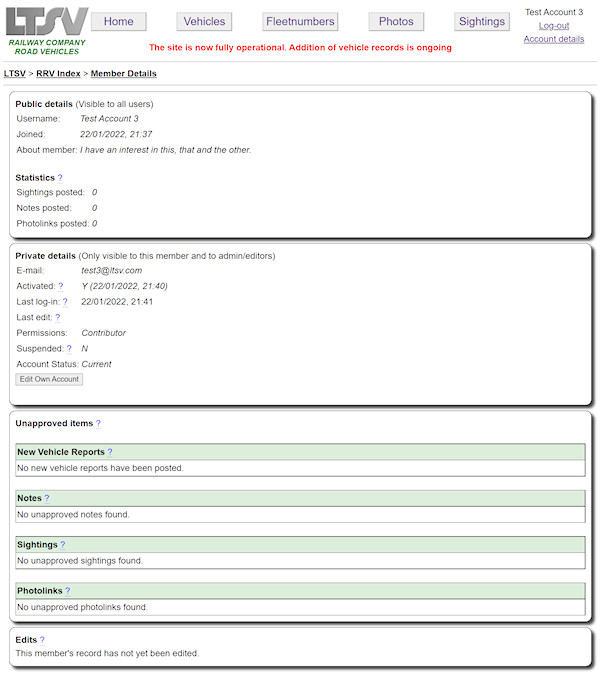
There is a lot of information on the Account details screen. The first box shows your public details, including statistics on how many items you have posted. The second box shows private information and includes a button to edit your account. The third box shows any items you have posted that are not approved (i.e. that will not be displayed elsewhere) and the final box shows details of any edits made to your account.

screenshot
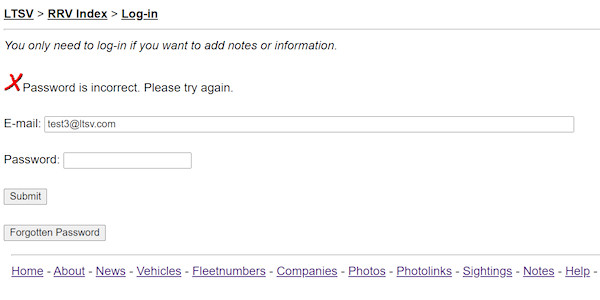
If you enter an incorrect password (and/or e-mail address) you will see a screen like this. You can try again or you can click on 'Forgotten Password'.

screenshot
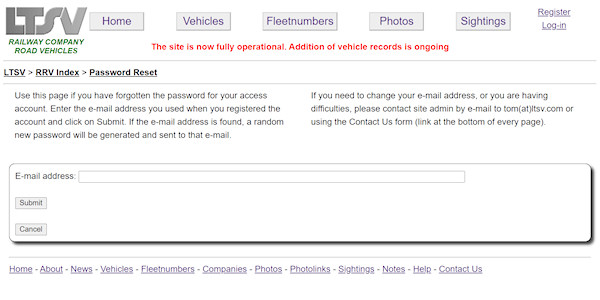
To reset your password, enter your e-mail address in the box and click on 'Submit'.

screenshot
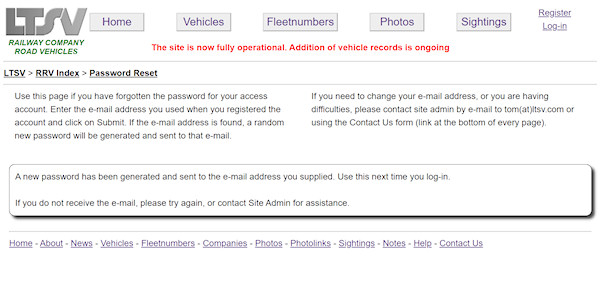
When your password has been reset you will see this screen. This advises that a new (random) password has been e-mailed to the address you supplied.

screenshot
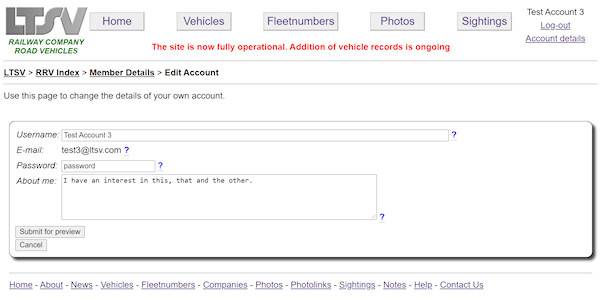
If you click on the 'Edit Own Account' button on the Account details page, you will see this screen. You can only change the username, password and/or biographical details. Submitted entries are checked in the same way as during the registration process.

screenshot
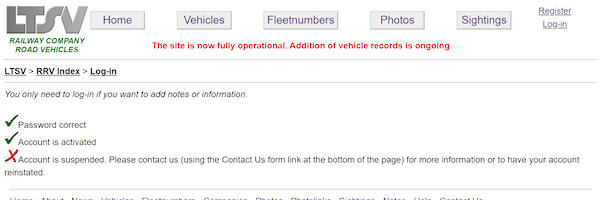
Accounts can be suspended if necessary. If you try to log-in to an account that has been suspended, you will see this screen and you will not be able to log-in.


Contributing information

Once you have created and activated an access account, you can log-in and start adding information to help make this website better. Users can add information in any of four ways:
Sightings
Notes
Photolinks
New Vehicle Reports

O Adding Sightings
You can post a report of a sighting of any vehicle that is listed in the database. This can be helpful as it will indicate where vehicles may be seen and whether they are still in use. When you post a sighting, you need to supply a date and a location, and you can optionally add further information as notes. Sightings are unmoderated, meaning that they will visible to all users as soon as they are submitted. However, Admin or Editor users reserve the right to 'unapprove' (i.e. hide) any posted sighting that they feel is incorrect, inappropriate or offensive.
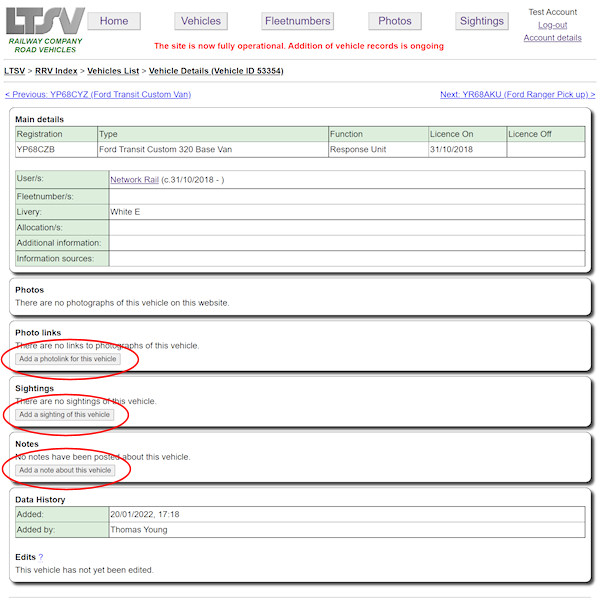
HOW: To add a sighting, navigate to the detail page for the vehicle concerned. If you are logged-in, there will be a button to add a new sighting.
screenshot
When you are logged-in and looking at the detail page for a particular vehicle, there will be buttons to allow you to add a photolink, a sighting or a note.
screenshot
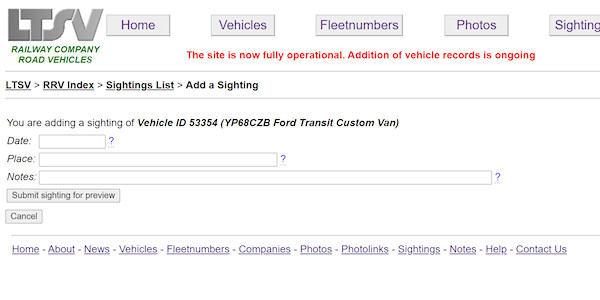
The page for adding a sighting has three fields, for the date, the location and any additional notes.
screenshot
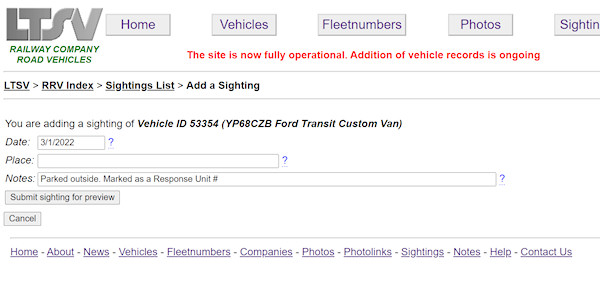
Type in the details of the sighting in each box. Hovering over the question marks will bring up some guidance notes.
screenshot
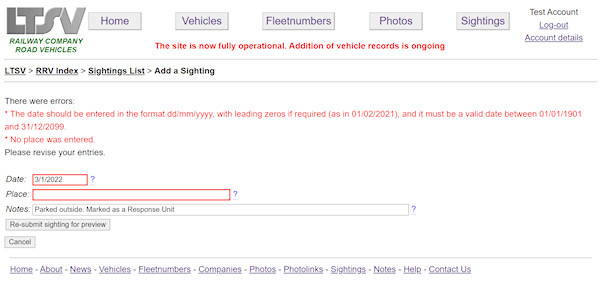
When you click on Submit, your entries are checked. If there are any errors, these will be shown. Errors can include missing information or incorrect date formats. You can make changes and click on Re-submit.
screenshot
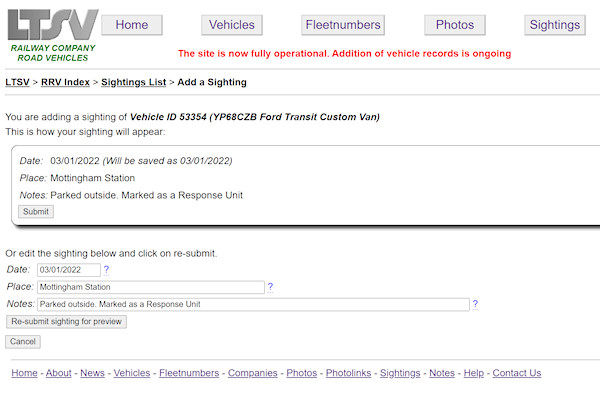
If there are no errors in your entries, a preview will be shown. You can check that the information looks the way you expected it to (certain special characters are automatically removed). If OK, click on Submit, or make changes and click on Re-submit.
screenshot
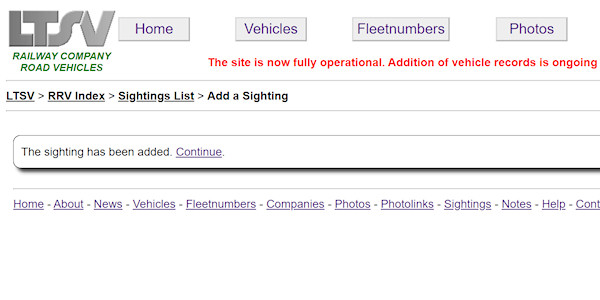
If the sighting has been added to the database, a success message appears. Clicking on Continue will take you back to the vehicle detail page.
screenshot
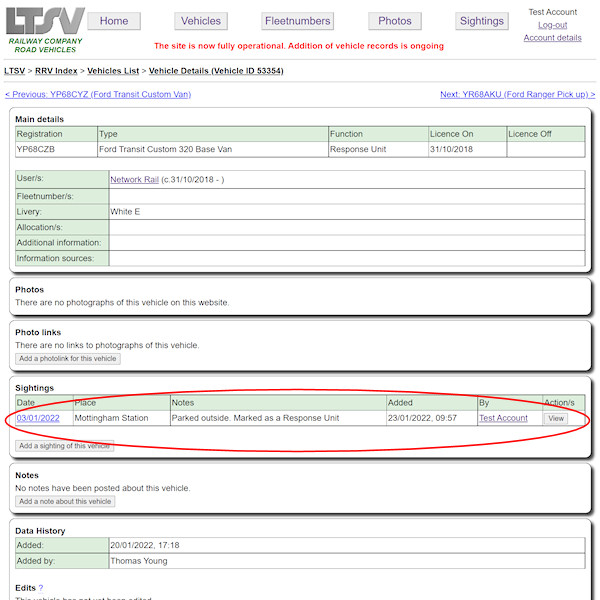
The vehicle detail page will now show the sighting you have just added. You can click on the View button to open the sighting detail page.
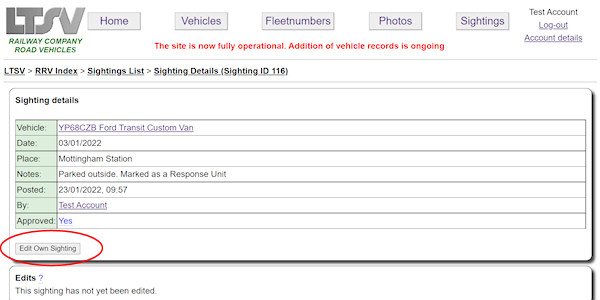
screenshot
When you are logged-in and looking at the detail page for a sighting that you have added, there will be a button to allow you to edit your own sighting.
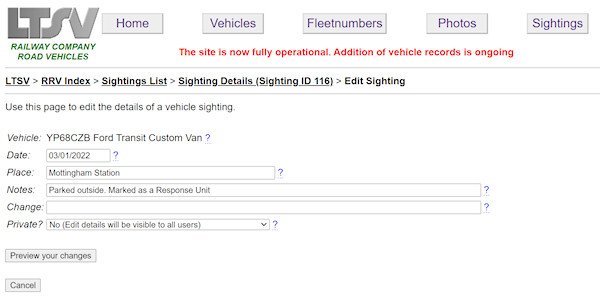
screenshot
The sighting edit page shows the existing values and allows you to make changes.
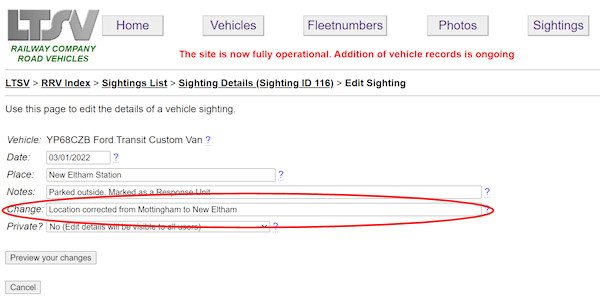
screenshot
When you are editing a sighting, there are two additional fields. The first is marked Change. Use these to give a brief summary of why and how the entry has been edited.
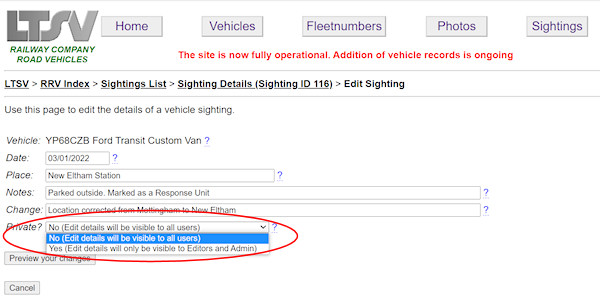
screenshot
There is also a drop-down marked Private. You can choose to make the edit private, meaning that normal users will not be able to see that the record has been changed. This can be used for minor changes such as correcting a spelling mistake. Whether an edit is marked as Private or not is down to you. Admin and Editors will be able to see all edits, regardless of their privacy.
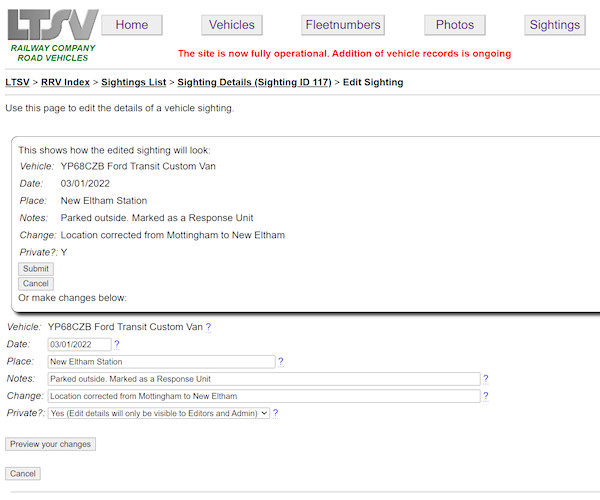
screenshot
When you click on Preview on the sighting edit page, your entries are checked as before and any errors will be flagged. If there are no errors, a preview will be shown. As before, you can either Submit the entry as it is shown, or make more changes and click on Preview.
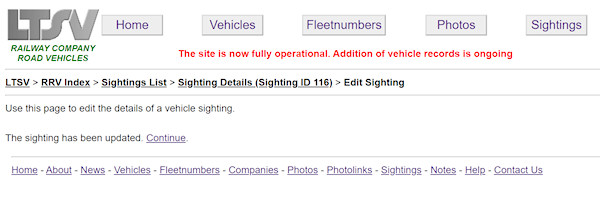
screenshot
Once your edits have been applied, a success screen appears. Clicking on Continue will take you back to the sighting detail page.
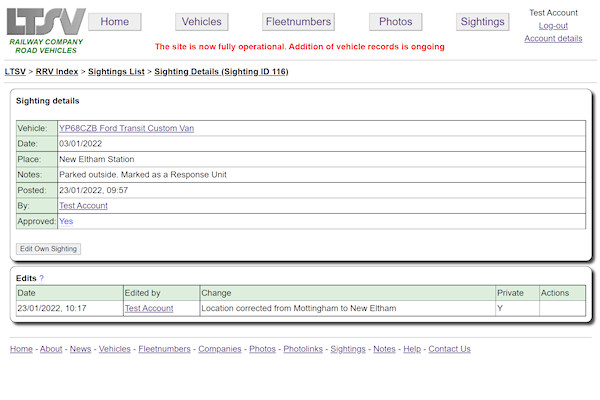
screenshot
The sighting detail page will now show the details of your edit.
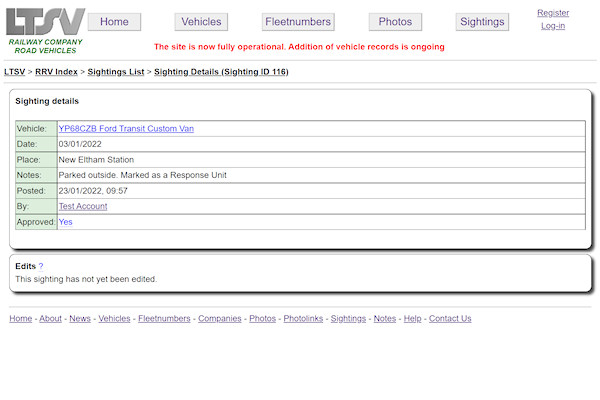
screenshot
A user who is not logged-in (or who is logged-in as someone else) will not be able to edit this sighting, and will not see any edits that were marked as private.
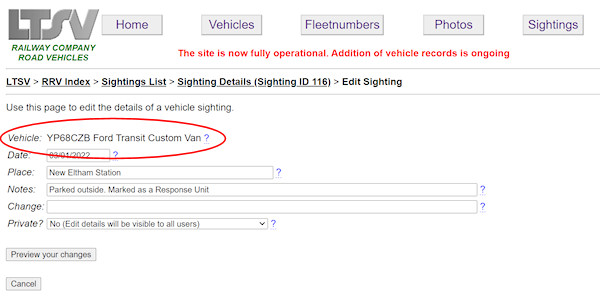
screenshot
At present, you cannot change the vehicle that a sighting relates to, nor can you delete a sighting. If you have entered a sighting against the wrong vehicle, please contact Site Admin.
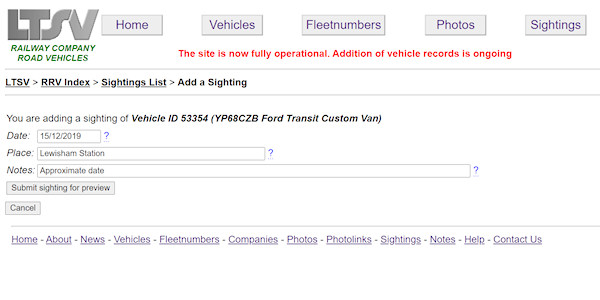
screenshot
The date field for sightings will only accept valid and specific dates. If the actual date is not known, enter an approximate date. You can indicate this in the notes field.
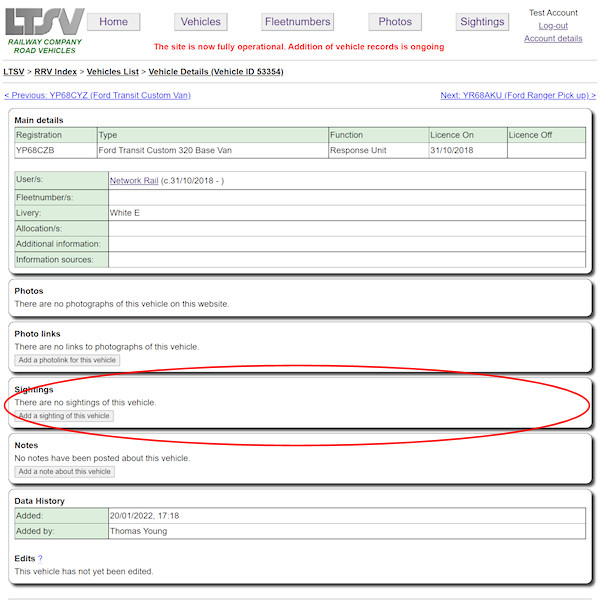
screenshot
Sightings are approved by default, meaning that all users will be able to see them as soon as they are submitted. However, Admin and Editor users have the right, in certain circumstances, to unapprove a sighting. This means it will no longer be visible when you are looking at the vehicle detail page (or elsewhere).
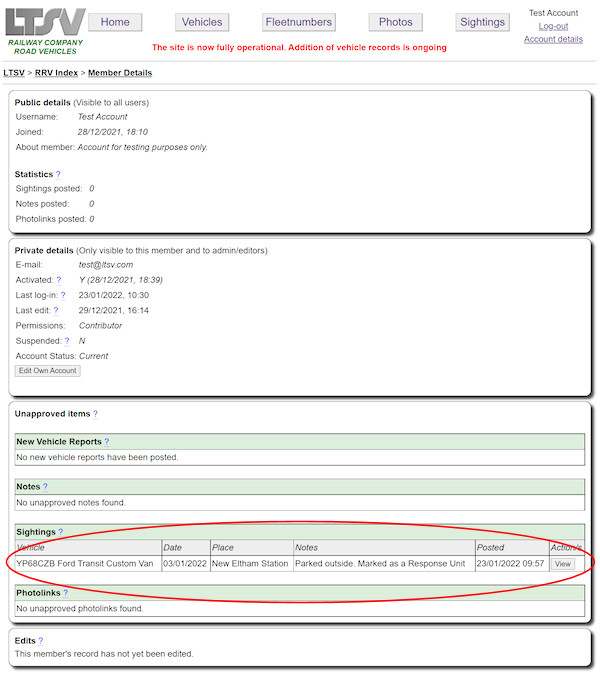
screenshot
To see if any of your sightings (or notes) have been unapproved, go the Account details page. Any unapproved items will be listed.
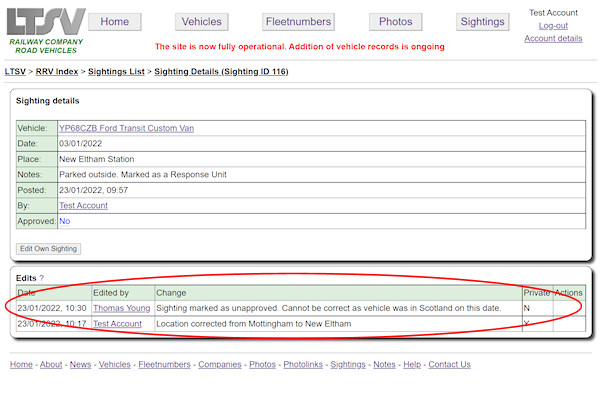
screenshot
If you click on the View button against an unapproved item on the Account detail page, you should be able to see the details of when and why the item was unapproved. You cannot approve an item yourself - if you want to query a decision, contact Site Admin.

O Adding Notes
You can post a note about any vehicle, company or photo within this website. Notes can contain any comments or information that you think may be of interest. Notes are unmoderated but may be removed if Admin deems them to be inappropriate.
HOW: To add a note, navigate to the detail page for the vehicle, company or photo concerned. If you are logged-in, there will be a button to add a new note.

screenshot
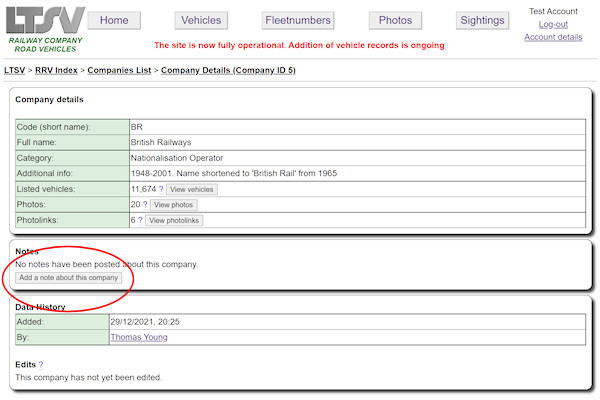
The process for adding notes is similar that for adding sightings, though notes can relate to any individual vehicle, company or photo. Detail pages for each category have a button for adding a note.

screenshot
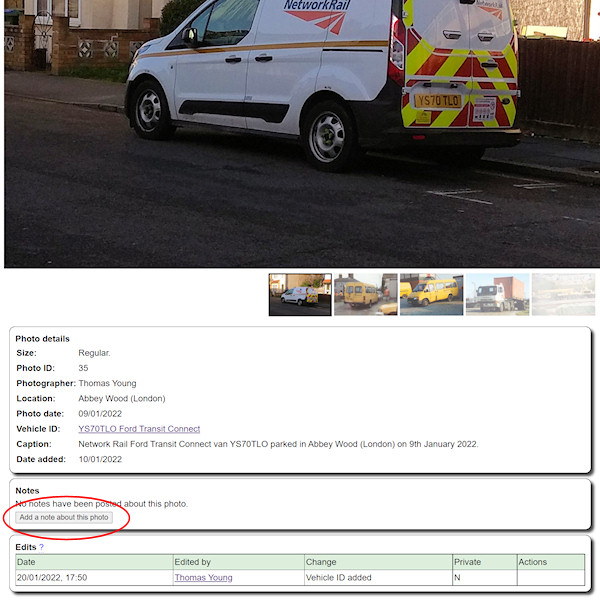
When looking at a photo, the Add a Note button is beneath the photo details.

screenshot
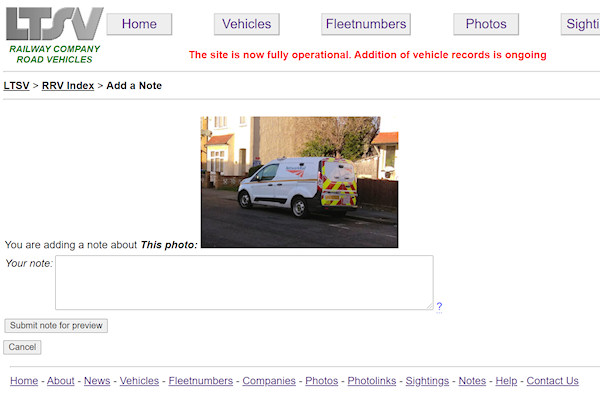
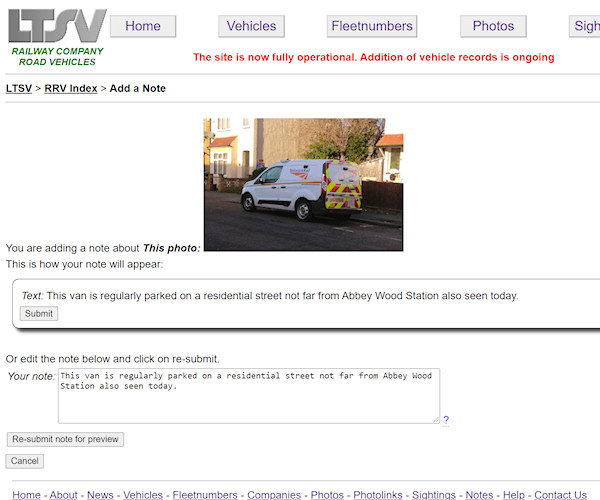
When you click an Add a Note button, this page will open. If the subject of the note is a photo, the photo will be shown.

screenshot
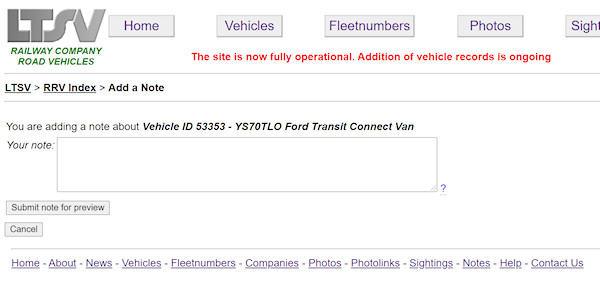
If adding a note about a vehicle, a line detailing the vehicle will be shown.

screenshot
There is only one text box on the Add Note page. Type or paste your text here then click on the Submit note for preview button.

screenshot
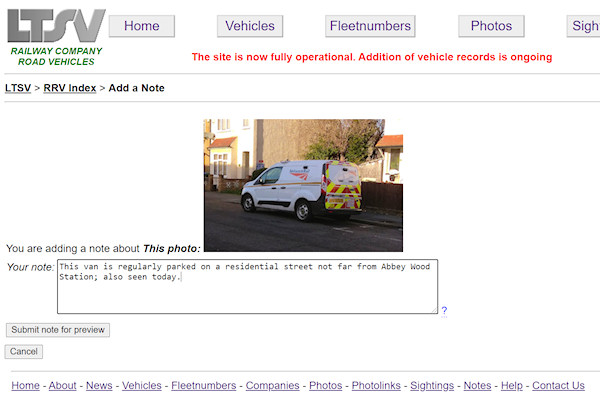
You will then be shown a preview of how your note will look. Be aware that certain characters are automatically removed to prevent hacking. In the examples shown, the semi-colon after Station has been removed. You can use the lower half of the page to make changes, for instance by adding a comma instead of a semi-colon.

screenshot
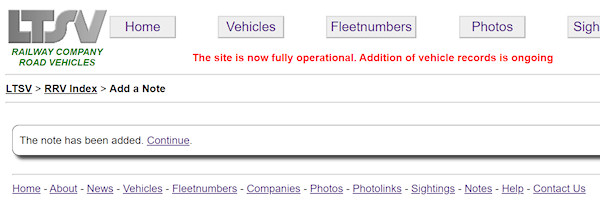
When your note has been submitted, you will see this screen. Clicking on continue will take you back to the detail page for the item you are leaving a note about.

screenshot
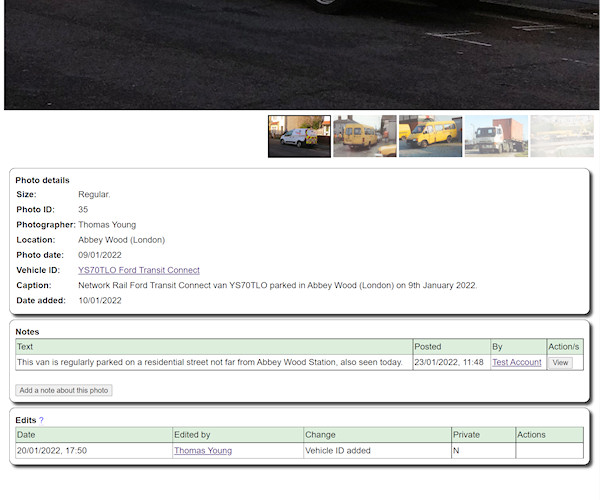
Your note will now appear in the Notes section.

screenshot
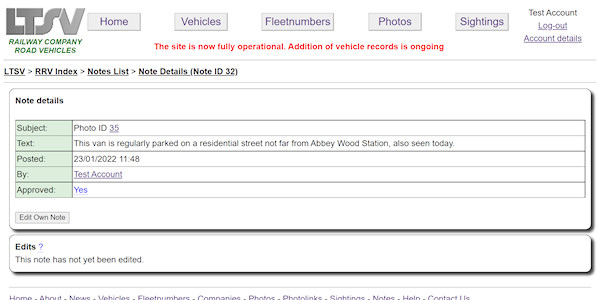
Clicking on the View button next to any note will open the Note details page. This doesn't show much more information but it does include editing options and a list of previous edits.

screenshot
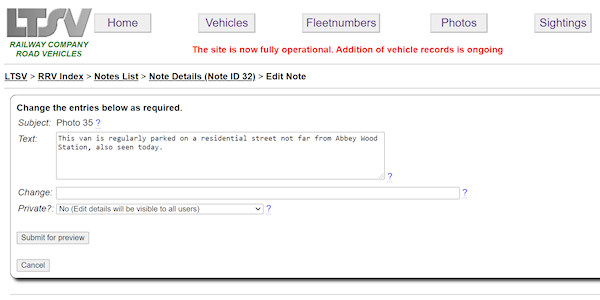
To edit a note you posted, click on the Edit Own Note button. This will open the note editing page.

screenshot
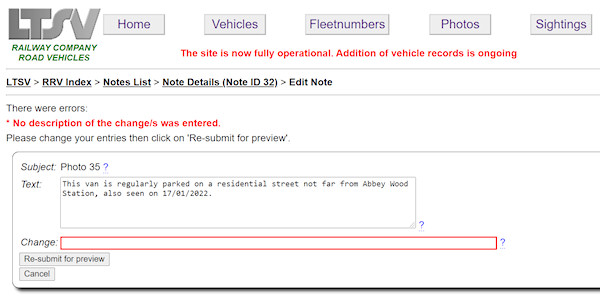
As with sightings, when editing you will be prompted to add a brief outline of what has been changed.

screenshot
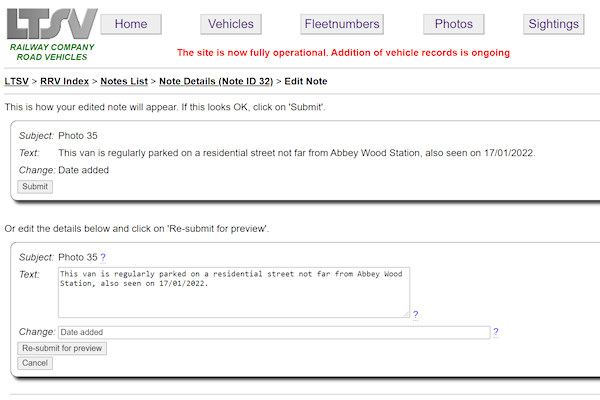
If accepted, a preview of your note will be shown, with the option to Submit or make further changes.

screenshot
When your edit is submitted, you will see a success screen like this. Clicking on Continue will take you back to the note detail page.

Notes are approved by default but can be unapproved by an Editor or Admin if needed. For more information on this, see the section above on adding sightings.

O Adding Photolinks
Photolinks are references to photos of railway company vehicles that can be found on other websites. At present, you can only add links to photos of vehicles that are already in the database but this may be reviewed. When you add a photolink, you need to supply the URL (web address) of the page containing the photo, along with any additional information. Photolinks are moderated, in that they will not be visible until they have been 'approved' by an Editor or Admin user.
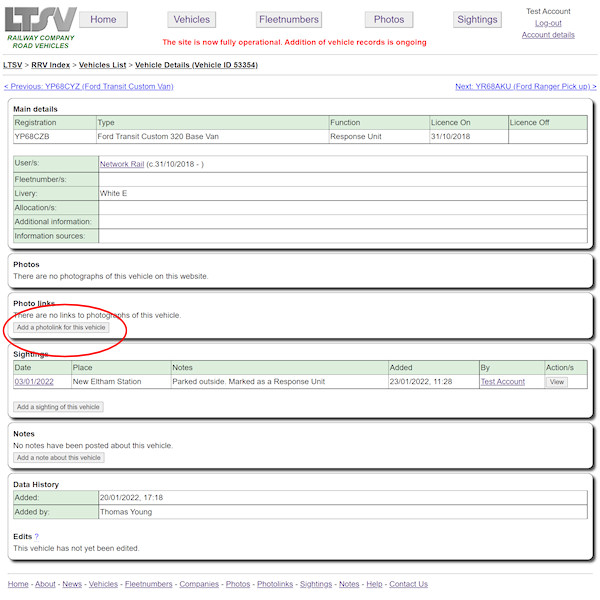
HOW: To add a photolink, navigate to the detail page for the vehicle concerned. If you are logged-in, there will be a button to add a new photolink.

screenshot
When you are logged-in, a button to add a Photolink appears on the detail page for every vehicle.

screenshot
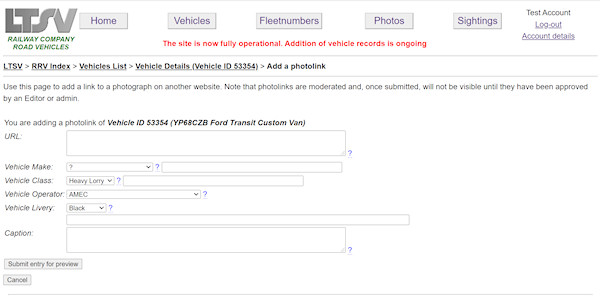
The page for adding photolinks has quite a few fields but works in much the same way as other pages.

screenshot
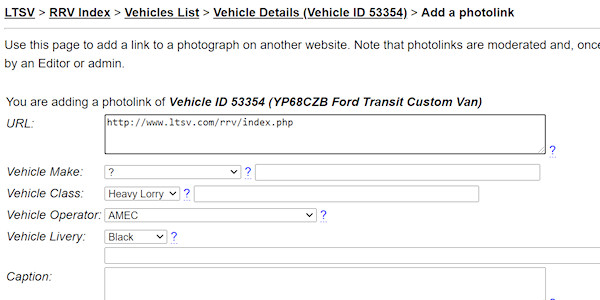
The most important field is the URL. Type or paste the web address in this box. The web address should point to the page where the photo can be viewed, not to the photo itself.

screenshot
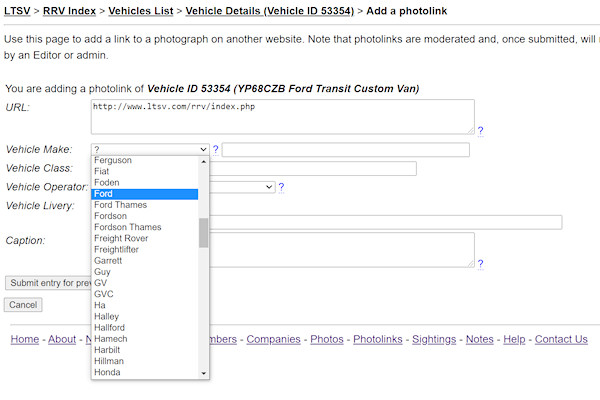
The next four fields are about the vehicle. These are somewhat superfluous given that the vehicle is already in the database. However, in future it is planned to allow photolinks to be added of vehicles that are not in the database. Note that several lines have both a drop-down box and a text entry box. If the required value is in the drop-down, click on it to select it.

screenshot
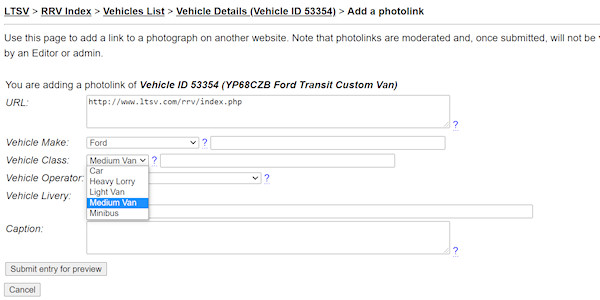
The Vehicle Class field is for a high-level description of the vehicle, for example Car, Heavy Lorry, Medium Van etc.

screenshot
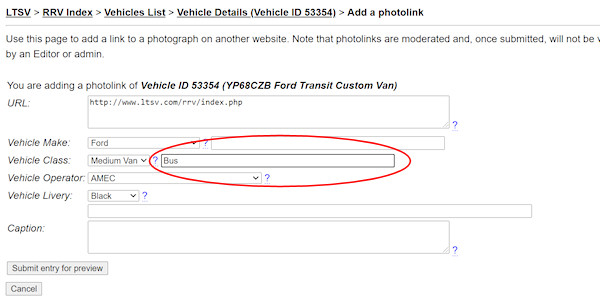
If the required value is not present in the drop-down, you can type it in the adjoining text box. Anything typed here will take precedence over anything selected from the list. In the example shown, Medium Van has been selected from the list, but Bus has been typed in the box. The latter value is the one that will be used.

screenshot
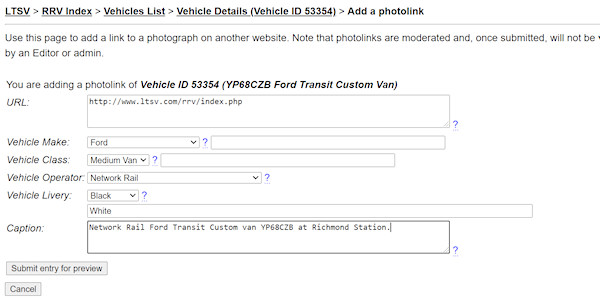
The caption field is used to give a narrative description of what the photograph shows. Note that this will normally repeat some of the information provided in the previous fields.

screenshot
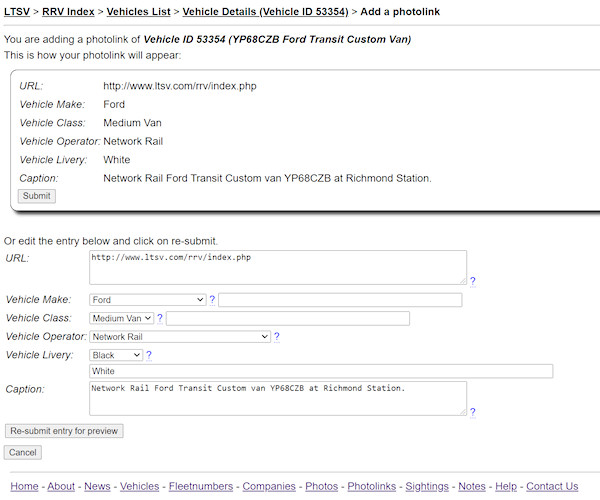
As with other pages, the next step is to preview your entries, looking out for any changes caused by the removal of non-allowed characters. The page also allows further changes to be made.

screenshot
When the photolink is submitted, you will see this screen. It advises that the photolink will not be visible until it has been approved.

screenshot
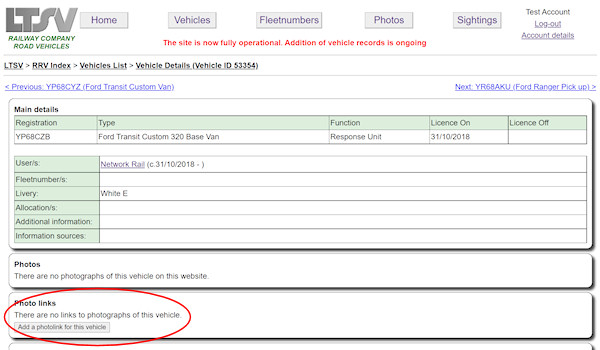
Clicking on Continue will take you back to the vehicle details page. Your new photolink will not be shown, as it will not yet have been approved.

screenshot
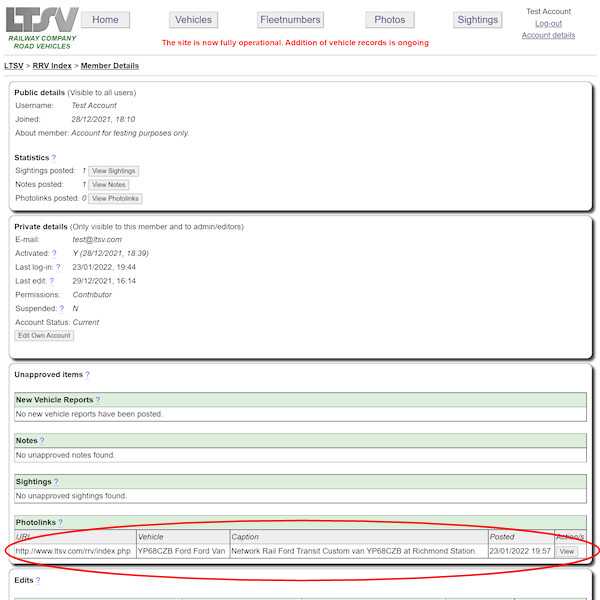
You can review the status of photolinks you have submitted by clicking on the Account details link in the top right corner. Clicking on the View button will open the photolink details page.

screenshot
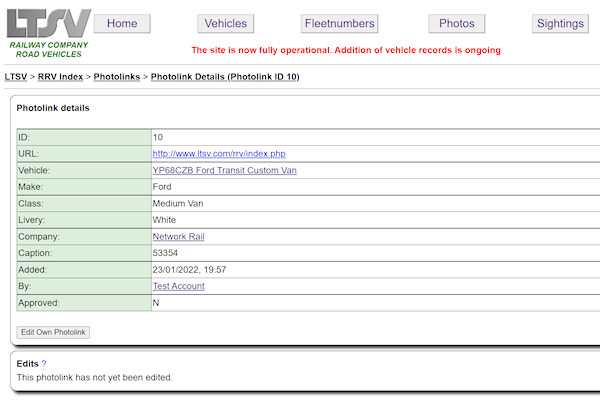
The photolink details page will show you the current status of the photolink, and also allow you to edit the entries.

screenshot
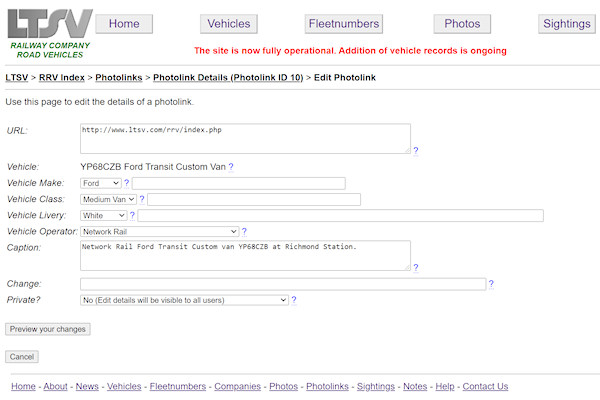
The page for editing a photolink is very like the other editing pages. Note that you cannot change the approval of your own photolinks. In fact, if you change the URL of a photolink that has already been approved, it will revert to being unapproved. This is required as all external links need to be checked before being published.

screenshot
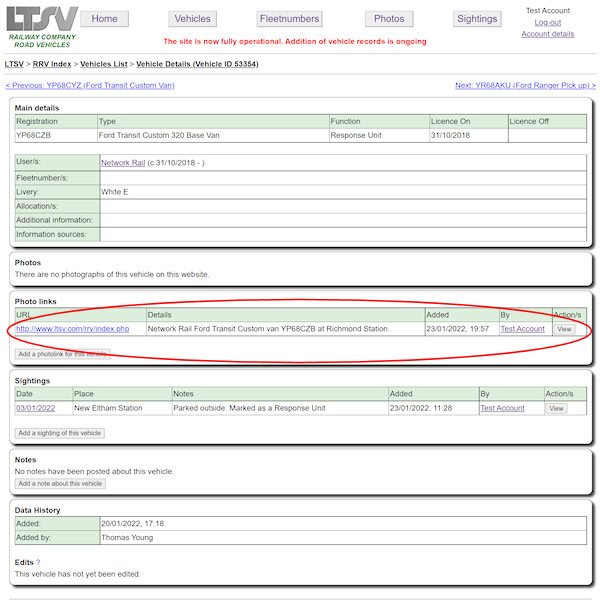
Once your photolink has been approved, it will appear on the vehicle details page, and also in the separate photolinks list page.

O Adding New Vehicle Reports
Coverage of the current fleet is somewhat patchy, since most of the information comes from observations. If you have seen (or know of) a vehicle that is not currently listed, you can help make the website better by telling us about it. A form has been provided where you can fill in certain details, such as the vehicle registration, type, livery and operator. When you submit this form, the vehicle does not get added to the database straight away. An Editor or Admin needs to review the report and, if appropriate, gather more information before adding the vehicle. As such it may be a few days before the vehicle appears. There may also be cases where the supplied information is deemed incorrect or insufficient and the vehicle cannot be added.
HOW: To report an unlisted vehicle, use the New Vehicle Report form. A link to this page will also be found in the Quick Links section of the home page, and on each of the two vehicle list pages. Note that you will need to be logged-in to use this form.

screenshot
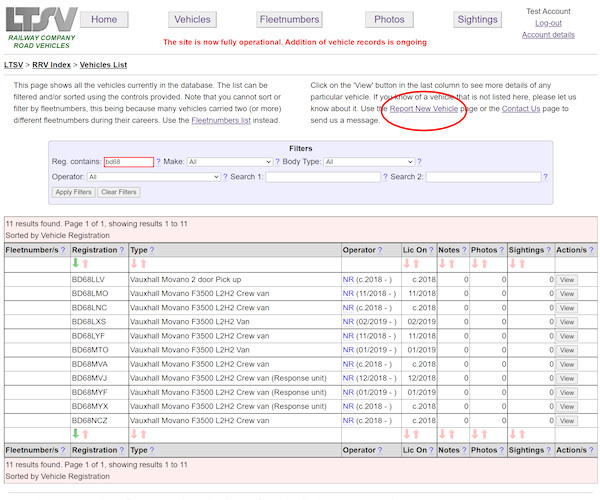
If you find that a vehicle you have seen (or know of) is not listed, you can report it. In the example shown above I have filtered the list to show vehicles whose registration contains BD68. I was looking for BD68MMF, but it is not listed, so I can click on the Report New Vehicle link.

screenshot
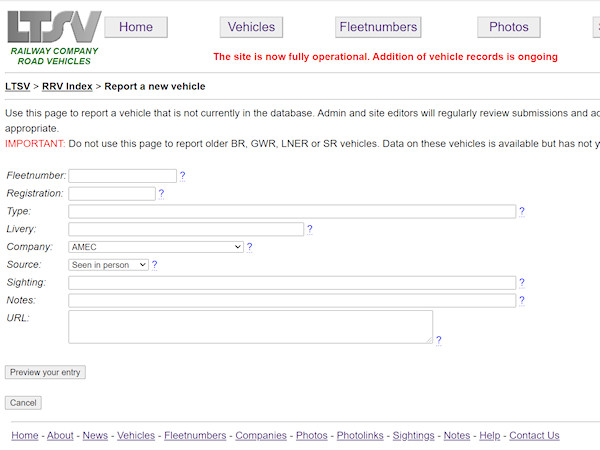
The layout of the New Vehicle Report page is similar to those already shown.

screenshot
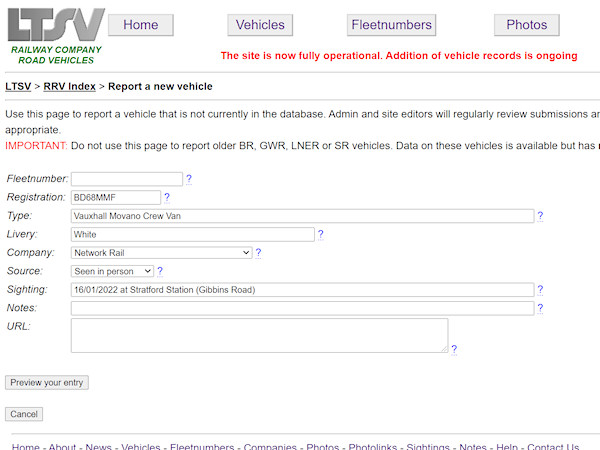
Enter the information in any fields that are relevant. You can say how you know about the vehicle (Seen in person, Photo on internet or Other). If seen, you can say when and where. If found on the internet, you can type/paste the URL of the webpage.

screenshot
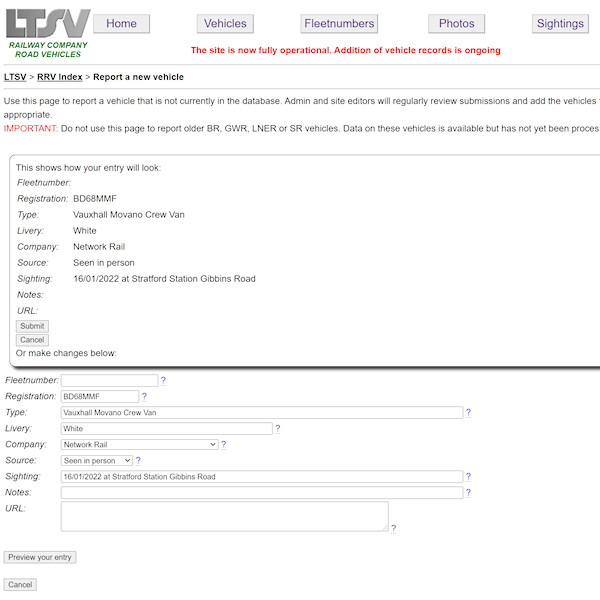
As normal, when you submit the page will prompt for any errors. If there are no errors, it will show a preview, along with a form to make further changes.

screenshot
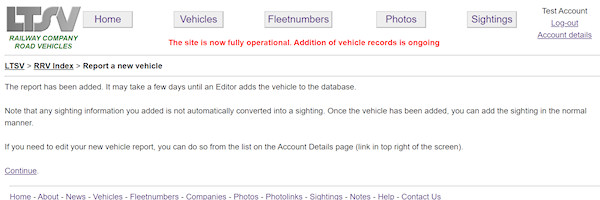
Once submitted, you will be advised that it may take a few days for your report to be reviewed.

screenshot
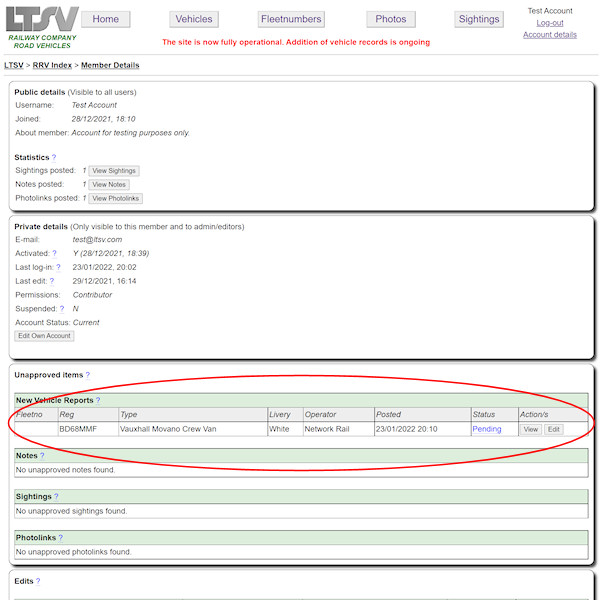
The status of your submitted New Vehicle Reports can be viewed on your account details page. The report shown above is marked as Pending, hence it can still be edited. Either click on the Edit button, or click on View to open the New Vehicle Report details page.

screenshot
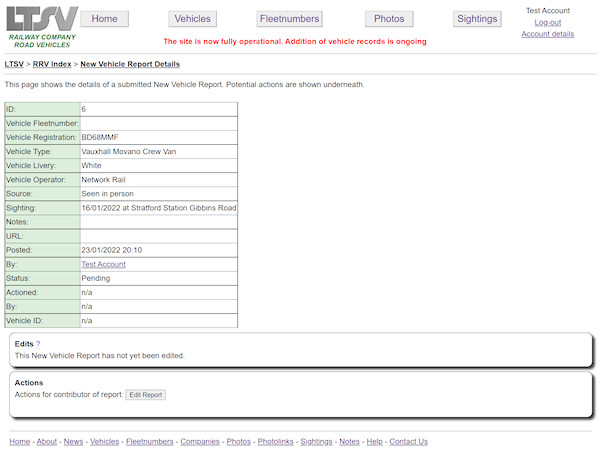
The New Vehicle Report details page shows the full report and also its current status. Any actions that are still available (e.g. Editing) will be shown in the Actions section underneath.

screenshot
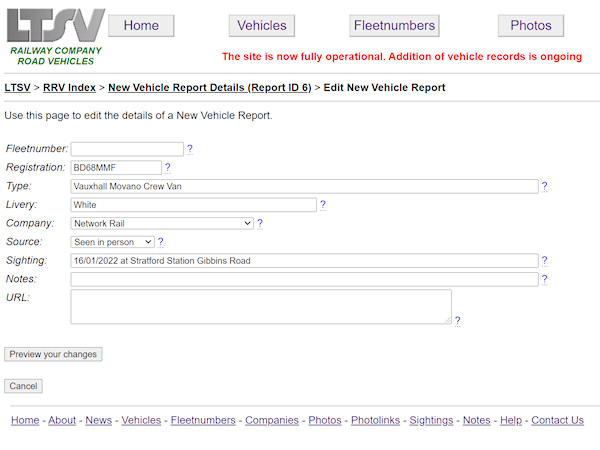
The page for editing a New Vehicle Report is very similar to other editing pages. As usual, entries are checked, then a preview is shown before final submission.

screenshot
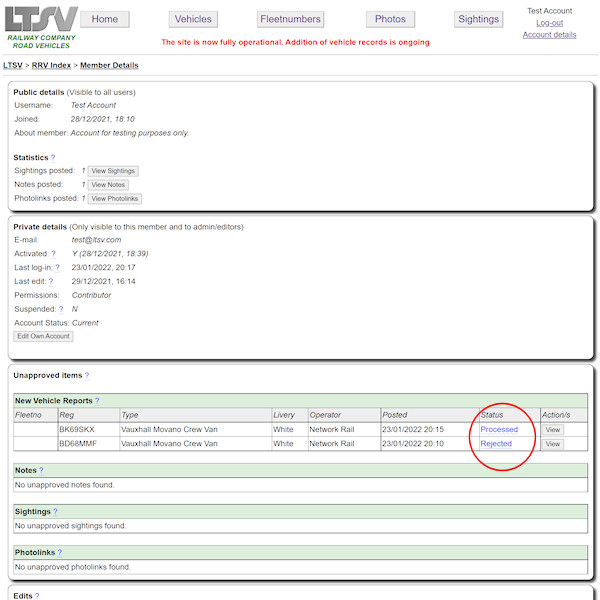
This view of an account details page shows two submitted New Vehicle Reports. One is marked Processed - this means that the vehicle has now been added to the database. If you entered any sighting details on your New Vehicle Report, you can now add these to the vehicle record. The second item is marked as Rejected, meaning that an Editor/Admin has decided not to add this vehicle to the database. There could be various reasons for this. At present there is no method for providing the details of these decisions. If you want to query any particular rejection, please contact Site Admin.


Getting more help
If you need any further assistance with using this website, please feel free to get in touch. You can use the Contact Us page (link at the bottom of every page), or you can e-mail me at tom(at)ltsv.com.